Wednesday, September 30, 2015

Xyron & Paper Smooches Paper Piecing Tutorial


Happy Wednesday Crafters!! Today I have a very special tutorial for you featuring the super cute stamps from Paper Smooches along with the adhesives from Xyron! I have to admit have have LOTS of Paper Smooches stamp sets, but I definitely think that Warm Hearts is one of the cutest- the little snowman image is just darling!


Other Products Used:
Paper Smooches Warm Hearts Stamp Set, Ranger Archival Black Ink, DCWV Woven Paper Pack, Distress Markers: Black Soot, Festive Berries, Spiced Marmalade, Tim Holtz Craft Scissors, Glossy Accents, My Favorite Things Dies: Stitched Rectangles, Distress Ink: Broken China, Ranger Ink Blending Tool, Ranger Non-Stick Craft Mat


Step-By-Step Directions
1. Cut a piece of patterned paper to 4” x 5.25”

2. Stamp the snowman image in a repeating pattern on the patterned paper with Archival Black ink. 


3. Stamp the snowman multiple times onto the DCWV Woven paper. 


4. Cut out each of the snowmen from the woven paper. 


5. Ink the edges if snowmen images with Broken China ink to create a shadow on one side of the snowmen. 


6. Color in the nose and heart on each snowman with Distress Markers.


7. Ink (with a blending tool) the snowman background piece created in step 2 with Broken China Distress ink.


8. Load the Xyron Creative Station with the 9” Permanent adhesive cartridge and run several (5) snowmen through the machine. Repeat with additional snowmen. 


9. One by one, adhere each snowman to it’s corresponding image on the stamped patterned paper piece- be sure to line up the arms. 


10. The Xyron 1.5” Sticker Maker can also be used to add the snowmen to the background.  I used this for the 2 extra snowmen I had after running 5 twice through the Creative Station in step 8. 


11. Turn finished piece over and trim the excess snowman parts from the edges. 


12. Cut a matching piece of patterned paper to 4.25” x 5.5” and ink the edges using a blending tool with Broken China Distress ink. 

13. Use the Xyron Mega Runner to apply adhesive to the back of the finished snowman background piece.

14.  Adhere the background piece to the mat cut in step 12. 


15. Stamp the sentiment onto the matching patterned paper with black ink. 


16. Cut out the sentiment by running it through a die cut machine using the appropriate size stitched rectangle die. 
17. Apply Xyron homemade foam tape to back of sentiment and adhere to card front.


18. Apply glossy accents to the heart and nose of each snowman and allow to dry.


Tip: To get the most use from the Xyron Creative Station and little waste- run as many pieces through at once, especially when using the larger 9” cartridge.  This also saves on time as well!

Thanks for joining me today and I hope you check back for more fun tutorials featuring Xyron adhesives and be sure to check my Portfolio page for lots more Paper Smooches inspiration!


Tuesday, September 29, 2015

Frothy Concoctions!

Happy Tuesday all! I am here today to share another fun project using Paper Wings Productions fantastic stamps!
Fall is here in New England and there is a crispness in the air-great fall days for hiking and of course my favorite: lattes!
So I thought I would create a project this week using the Frothy Concoctions stamp set:


To create this card I did a lot of stamping,fussy cutting and paper piecing-giving each portion of the latte cup some texture. White woven paper was used for the lid, cork for the sleeve and patterned paper for the cup itself. 


This is one of two fabulous coffee themed sets from PWP, the other is Play With Your Coffee - be sure to check them out online at the store!
Nothing like coming in from a cool fall walk outside and having a yummy latte!
Thanks for joining me again this week and be sure to check back often for more DT inspiration with the PWP stamps!

Wednesday, September 23, 2015

Happy Halloween with Just for Fun Stamps!

Hello all! Pam here today to share with you a "frightful" Halloween card using the fabulous Just for Fun Rubber Stamps and some fun techniques.
Halloween is one of my favorite holidays and I just love conjuring up spooky projects like this one.


To create this background I stamped JFF's Web Background (J2326) onto manila card stock with black acrylic paint and dried with a heat tool to create a resist. Overtop I sprayed various Halloween-ie colors (oranges, purples and black) using Ranger Distress Stain sprays and Dylusions sprays.  I added some white accents with Hero Arts Unicorn white spray.  After drying completely I then stamped Bats (A3478 over the background in various spots with Archival Jet Black ink. Because the web background is a resist, the bats appear to be flying behind the web, which is a super cool effect.


To finish off the card I added some Tim Holtz Alpha Parts for the "31" and the sentiment "Happy Halloween".
Thanks for joining me today for my first post for the Just for Fun Design Team.  Stay posted here on my blog for lots more great inspiration!

Tuesday, September 22, 2015

Christmas with Creative Vision Stamps

Good Morning all! Today I wanted to share with you some Christmas greetings I created with some of the new and old releases from Creative Vision stamps!  I just love their Christmas stamps and as always I try to use them in new and different ways and each card with a different technique.

So hear they are-and remember there are only 13 more Fridays before Christmas!! 


Stamp Set: Dancing Reindeer
Technique: Altered Patterned Paper/Embossed Resist


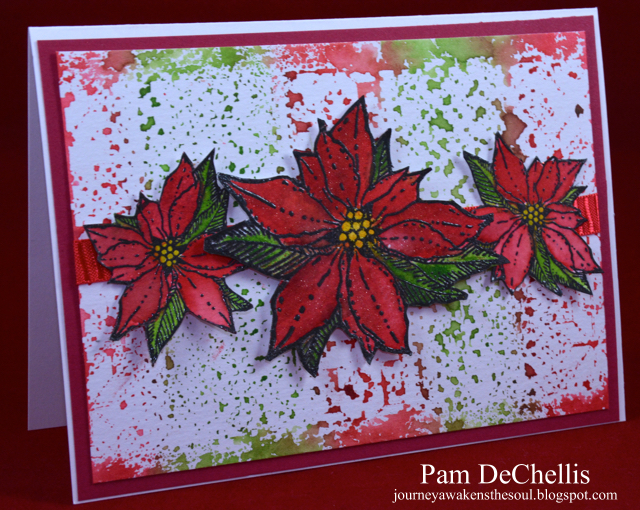
Stamp Set: Poinsettia #3
Technique: Distress Watercolor/Stencil Mono Print background


Stamp Sets: Christmas Collection #4, Santa with Open Arms
Technique: Inked Embossing Folders


Stamp Sets: Christmas Collection #4
Technique:Embossed Resist Background


Stamp Set: Merry Christmas Tree
Technique: Painted Resist Stamping

Be sure to check out the Creative Vision Stamps' Online Store for these and so many other great stamps!


Saturday, September 19, 2015

To Dream...

Good Morning Junkies! Happy Saturday!  I am back in the studio after a fantastic two week vacation at the beach and so excited to be creating again!
This week I am featuring two fantastic stamps fromTechnique Junkies Wasted from the Palettini collection and the sentiment Have Wings.


I absolutely love the background stamp Wasted and for this card I stamped it with white acrylic paint to create a resist.  To create the ethereal background Distress Inks were used over the resist.  A second piece was also created with distress inks using the same colors and then the butterflies (Tim Holtz/Sizzix Movers and Shapers)  were die cut from this to coordinate with the background.


The sentiment Have Wings was just perfect to finish off this card! All pieces were adhered using homemade Xyron dimensional adhesive and the Xyron Creative Station.


Thanks for joining me today and be sure to follow the TJ Design team blog and my blog for more great inspiration and techniques using TJ stamps.

Friday, September 18, 2015

Cut it Up Challenge: Oh Brother (or Sister)...

Hello crafty friends! I am back from vacation- and although I really miss the beach, Fall is in the air here I love it!
For this week's Cut it Up Challenge the theme is:

Oh Brother! (or Sister/Best Buddy)  Make something for your sibling or someone who is like a sibling to you!  Now here's the fun part of this challenge:  Share the story behind your creation!

So for my Design Team Inspiration project I chose to make something for my oldest sister Reggie!  Reggie is very crafty and paints, sews, and quilts! She has been a great inspiration and support in sharing my crafting/designing dreams.  AND she LOVES snowmen! 


I love the layers and the textures used in this design and the die cut was actually used as the negative to expose the snowman in the background.  The background was created by first using a Distress Ink technique from Tim Holtz called Wrinkle Free Distress- and I added a bit of flair of my own with some Perfect Pearls mixed in.  Then the entire piece was run through an embossing folder to create the snowflakes. 
I cut the snowman Tim Holtz/Sizzix Bigz die) from corrugate and used some spray stains to give it some color (white/blue)-and I used the negative piece over the background I created.


Winter Wonderland was also cut from corrugate using Tim Holtz Holiday thin-lits and sprayed with Hero Arts Unicorn White.
All pieces were adhered using the Xyron Creative Station and the Xyron 1.5" Sticker Maker.
I cannot believe the summer is over since I was just at the beach here in  Massachusetts last week. Looking forward to Fall and sweatshirt weather! 
Before we know it winter will be here- and Christmas too- so I am getting a jump start on my Christmas greetings!
Hope you will join in the Cut it Up Challenge this week too and make something fun for your favorite sibling!

Tuesday, September 15, 2015

A Merry Little Christmas...with Craftwell and Xyron

Christmas will be here before we know it. Get a jump start on those Christmas greetings with Craftwell dies and Xyron of course!


Xyron Creative Station, Xyron 5” Permanent Adhesive Cartridge. Xyron 9” Permanent Adhesive Cartridge, Xyron 3" Sticker Maker
Other Products Used:
Craftwell Teresa Collins Thankful Holiday Dies, Ranger Distress Ink Mowed Lawn, DCWV Stack, Perfect Pearls Mint Green, Green Patina, Sizzix embossing folder, Neenah Solar White card stock, Tim Holtz Idea-ology stars, Ranger Brushed Pewter Alcohol ink, Hero Arts Unicorn White Ink, Brilliance Silver Ink, Archival Black Ink, Stickles Silver

Step-by-Step Tutorial 


Set up Craftwell small tree die to cut from glitzy patterned paper. 


Run through die cut machine twice to ensure a good clean cut. 


Cut a 4.25” x 5.5” of white card stock and ink direct to paper with Mowed Lawn Distress ink. 

While the ink is still wet on the paper apply Perfect Pearls to entire piece to add shimmer and glitz. 


Place inked piece into embossing folding and run through die cut/embossing machine.


Using a small flat sponge apply Hero Arts White Unicorn ink to embossed areas-small dots.


Repeat step 6 with Brilliance ink 

Run piece through the Xyron Creative Station loaded with the 5” Permanent adhesive cartridge.


Cut a coordinating piece of patterned card stock slightly larger than you main piece and adhere main piece. 


Run the three trees cut in step one through the Xyron Creative Station loaded with the 5” Permanent adhesive cartridge. 

Adhere trees to card front, slightly overlapping. 

Apply a small amount of Brushed pewter alcohol ink to the Tim Holtz Idea-ology stars and let dry. 


Run the small star pieces through the Xyron 3” Sticker Maker. 
Adhere stars to tops of trees.


Apply small dots of silver Stickles to trees for added dimension and allow to dry thoroughly. 


Load the Xyron Creative Station with the 9” Permanent Adhesive cartridge. 


Run the entire piece through the Xyron Creative Station loaded with the 9” cartridge. 
Adhere piece  to a piece a white card base cut slightly larger than finished piece.
Stamp Have Yourself a Merry Little Christmas in Archival Black onto white card stock and flag. Cut out and flag each end-ink edges with green ink.