Wednesday, December 30, 2015

Xyron Home Decor Tutorial

Happy Wednesday crafters! Today I am here to share with you a fun home decor tutorial-celebrating the men and women that serve in our military.  Especially this time of year I appreciate the great sacrifice these soldiers make being away from their families during the holidays and everyday!
In our of the brave men and women in our military here's a project you can make for the soldier in your life.


Xyron Products Used: Xyron Creative Station, Xyron 9" Permanent Adhesive Cartridge
Other Products Used: Rectangular Wooden blocks x 3, Tim Holtz Holiday Seasonal Stash, Tim Holtz Grungeboard Alphabet, Ranger Distress Ink Vintage Photo and Antique Linen, Ranger Distress Glitter, Tim Holtz Idea-ology Trophy Cup, Tim Holtz Idea-ology Charms, Tim Holtz Sanding Block, Ranger Matte Multi Medium

Step by Step Tutorial


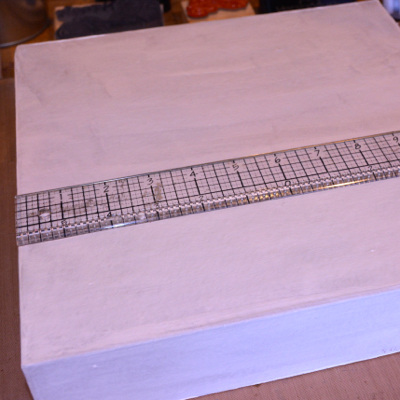
1. Trace each side of the wooden block onto the patterned paper.


2. Cut out each strip.


3. Run strips through the Xyron Creative Station, loaded with the 9" Permanent Adhesive Cartridge.


4. Adhere each corresponding strip to all sides of the wooden block.


5. Repeat above steps  for the other two wooden blocks.


6. Sand all  the edges of each of the blocks gently.


7. Apply Vintage Photo distress ink to the sanded edges.


8. Paint "U" "S""A" grungeboard letters with white acrylic paint, let dry and apply Ranger Matte Multi Medium over top.


9. Sprinkle glitter over top of each of the letters after applying the liquid adhesive.


10. Allow pieces to dry and glitter to adhere, then run through the Xyron Creative Station.


11. Apply one letter to each block.

12. Add further embellishments as desired (trophy cup and ribbon).


Wednesday, December 23, 2015

Christmas Stocking Stuffers: Note Card Sets

Happy Wednesday all! I am here  today to share a great stocking stuffer idea just in time for the holiday!  Now that all my holiday cards are completed and sent it's time to work on some little gifts!  I am making various note card sets as stocking stuffers!! Here's one I made using the Just for Fun Stamp Framed Fern.  The best part are these note cards are blank inside and can be used for any occasion, great to have on hand to send out in a pinch.


I stamped the fern with Versamark onto watercolor paper and covered it with clear embossing powder. Using watercolor markers I colored over top and then "wet" the areas to blend.  So beautiful,yet so simple and this is such a great stamp for this technique.


To complement the fern, I created a watercolor stencil mono print background in coordinating colors.
And yes there is still time to make some for your friends and family!
Thanks for joining me today- I hope everyone has a very safe and Happy Holiday!
Embrace Imperfection!
Pam

Tuesday, December 15, 2015

Xyron/Clearsnap Christmas Tutorial

Happy Tuesday everyone!  Can you believe that next week it's Christmas? Well there is still time to get those Christmas greetings out and today I am sharing a quick tutorial for a Christmas card using Clearsnap Colorbox Dye ink Spritzer, Colorbox Art Screens and Xyron Adhesives.


Xyron Products Used: Xyron Creative Station, 9" Permanent Adhesive Cartridge, Xyron 1.5 " Sticker Maker, Xyron Mega Runner

Other Products Used: Colorbox Art Screen Stripes , Colorbox Spritzer Fireberry, Ranger Festive Berries Distress Ink, Tim Holtz Holiday Blueprint Stamps, Christmas Red Stickles, Tim Holtz Watercolor Paper, Copic Markers, Memento Tuxedo Black Ink, Ranger Heat Tool

Step By Step Instructions

B

1. Apply Distress ink directly to the back of the Colorbox Art Screen.


2. Spritz with Colorbox Dye ink Spritzer.


3. Carefully place the Art screen, ink side down onto watercolor paper and place a paper towel over and gently press down on art screen. 


4. Remove Art Screen carefully.


5. Dry completely with Heat Tool.


6. Stamp image onto white card stock with Memento Black Ink.


7. Color image with Copic markers and cut out.


8. Stamp image again onto the background created (stencil mono print) with Ranger Archival Black ink.


9. Run the cut image through the Xyron Creative Station, loaded with either the 5' Permanent Adhesive Cartridge or the 9".


10. Adhere the image to it's corresponding spot on the card.


11. Cut out the "candy cane" label and run it through the Xyron 1.5" sticker maker and adhere to card.


12. Apply Stickles and Wink of Stella to candy cane for added shimmer and texture.


13. Use the Xyron Mega Runner to adhere to a card base 4.25" x 5.5".


Thanks for joining me today for the Xyron/Clearsnap partner tutorial and I hope everyone has very Merry Christmas and Happy and Safe New Year!


Monday, November 30, 2015

Advent Calendar with Xyron & Pebbles

Have you started counting down the days until Christmas yet? Well Xyron and Pebbles have in this super fun tutorial on making an Advent Calendar!  Best part is there are goodies inside to reward you for all your craftiness while you count down the days until Santa brings you everything on your craft list...that's if you haven't been naughty-lol.

  
Advent Calendar featuring paper by Pebbles


Close up of the goodies inside!


Back 


Sides

Supplies
Xyron Products Used: Xyron Mega Runner, Xyron 1.5" Create-a-Sticker, Xyron Creative Station, Xyron 9" Permanent Adhesive Refill
Other Products: Pebbles Winter Wonderland Collection, Advent Calendar, DCWV Glitter Stack, Washi Tape, Tim Holtz Snowflake punch, Tim Holtz Alphabet Thinlits, White Gesso,Heat Tool, black card stock 

Step by Step Instructions


 1. Paint entire advent calendar with an even cost of white gesso.


2. Dry completely with heat tool or set aside to dry.


3. Paint each individual box with white gesso (except for inside).


4. Measure dimensions of backside of calendar.


5. Cut the 12 x 12 Pebbles paper to the dimensions from step 4 using a paper trimmer.


6. Apply adhesive using the Xyron Mega runner to backside of paper from step 5.


7. Adhere evenly and smoothly to back of calendar.
8. measure dimension of sides, top and bottom of calendar and cut from Pebbles  paper using a paper trimmer.


9. Run these cut pieces through the Xyron Creative Station loaded with the 9" Permanent Adhesive cartridge.


10. Adhere pieces to top, bottom and side of calendar smoothly and evenly.


11. Measure dimensions of front of drawers and cut 25 pieces from coordinating paper (Pebbles).


12. Run pieces through the Xyron Creative Station until all have adhesive.


13. Adhere to front of each drawer and trim out notch.


14. Use Tim Holtz snowflake punch to punch 25  snowflakes from glitter paper.


15. Using a die cut machine and Tim Holtz thinlits (alphabet) cut the numbers 1-25 from black card stock.


16. Run each number through the Xyron 1.5" Create-a Sticker.


17. Run each snowflake through the Xyron 1.5" Create-a Sticker.


18. Adhere each number (1-25) to a snowflake.


19. Adhere each snowflake to a finished drawer.
20. Add some coordinating washi tape around the seams and some snowflake embellishments to the top and side.