Thursday, September 10, 2015

Halloween is Here...Well Almost!

Hello crafty friends!  Here today to share one of my first Halloween projects of the season.  Halloween cards and projects are my absolute favorite to create- I love the color combos- oranges, purples and blacks and all the spooky details.
So of course I was so excited to use the Halloween is Here stamp set from Paper Wings Productions.


The set includes five stamps and I was able to use three of them for this card. 


For those of you that follow my work- you know I LOVE to create my own backgrounds and rarely use patterned papers.  So this card was no exception; I created a stencil mono print  background on water color paper with a Crafter's Workshop stencil and distress inks.  The stamps were stamped in Archival black ink on paper that was covered with Distress inks and then a layer of Perfect Pearls- to give then some luster !


So stay tuned here to the PWP blog and on my blog for more fun Halloween projects to come!
PWP has more great Halloween stamps- be sure to check them out!


Saturday, September 5, 2015

Paw Prints

Happy Saturday Junkies!  While this post goes live this morning I am actually on vacation-at the beach! This is the first two week vacation I have taken in a very long time...but unfortunately we had to leave our fur baby girl Tanner  at home with the dog sitter. So of course we miss her which inspired me to make this project today featuring the TJ stamp  SD641 Paw Prints.


The background is faux textured metal using Distress ink and Perfect Pearls.  The embossed portion was then inked with Archival Black.


 I just LOVE this stamp and sentiment-for those of you who follow my FB page you all know how much I love my pupsters!
Paw Prints was stamped onto Neenah Desert Storm card stock  in Versafine Black Onyx ink and covered with clear embossing powder. 
Thanks for joining me today and stay tuned to the  Technique Junkies DT Blog as well as here on my blog for more great projects featuring TJ stamps!
Embrace Imperfection!
Pam

Tuesday, September 1, 2015

Technique Junkies Sept Blog Hop: Fright Night

Happy September Junkies!
Fall is in the air and that means my favorite holiday is coming up HALLOWEEN! I just love the crisp cool mornings of fall and all the fabulous inspirational fall colors!

The  Technique Junkie Design Team is celebrating September with a blog hop showcasing all of the new designs for this month.  You should have arrived here from the Design Team Blog-if not be sure to start there so not to miss all the great inspiration!


 You can SAVE during these celebration days as well.  The September Release stamps will be on SALE (15% OFF) until Sept 8th!  Get them while their hot!!

Today's card features the September releases Black Cat and Fright Night.


The technique used for the background is a modified version of Faux Textured Metal (Jennifer McGuire).  A 5.5" x 4.25" piece of Neenah White card stock was inked direct to paper with Spice Marmelade Distress ink. While the ink was still wet, I applied Mandarin Perfect Pearls Powder to give the entire piece a metallic sheen.  The piece was then run through a Darice embossing folder (spider webs). The raised portion was then inked with Archival Black.


For the black cat, the background inking was completed first with Distress ink and then stamped with Archival Black, trimmed and matted with black card stock.


Finally the sentiment piece was stamped onto an orange inked piece of card stock, trimmed and placed atop some Tim Holtz tinsel.

Thanks so much for joining me today and be sure not to miss the rest of the hop for more incredible inspiration.  Your next stop on the hop is the FABULOUS Sally Lynn MacDonald-she is an amazing artist and her work is not to be missed! Honored to be on this great team with her!
The entire blog line up is below in case you go astray and need to find your way back!
As always, Embrace Imperfection!
Pam

Pam DeChellis  YOU ARE HERE


Friday, August 28, 2015

Xyron-Anna Griffin Pretty Paintings Card Kit Tutorial

Happy Friday everyone! TGIF and it's the first day of my 2 week vacation on the beach! But of course before I head off I wanted to share with you a simple and quick project for wedding cards, made with the Anna Griffin Pretty Paintings card kit and Xyron adhesives.

Both Anna Griffin and Xyron will be featured on the Home Shopping Network  (HSN) on September 8th so be sure to tune in to grab these incredible products!


Xyron Products Used: 
Xyron Creative Station, Xyron 5” Permanent Adhesive Cartridge, Xyron 3" Sticker Maker

Other Products Used:
Anna Griffin Pretty Paintings Card Kit, Zig Wink of Stella, Paper Inspirations Marriage Calligraphy stamp, 7 Gypsies “Best Thing In Life” stamp, VersaMark Watermark ink, Liquid Platinum Embossing Powder, Milwaukee Heat Gun, Ranger Non-Stick Craft Mat, Fiskars Paper Trimmer, EK Success Powder Tool


Step-by-Step Directions
1. Choose a 3-1/4" x 5-1/4" card layer and matching/coordinating 5 x 7 card base to work with.
2. Ink the Marriage Calligraphy stamp with VersaMark Ink. 


3. Use a powder tool to brush the 3-1/4" x 5-1/4" card layer before embossing.


4. Stamp the Marriage Calligraphy sentiment onto the card layer. 


5. Sprinkle Liquid Platinum embossing powder over the inked area. 


6. Shake off excess embossing powder gently and use heat gun to activate/melt powder. 


7. Cut a piece of Neenah Solar White card stock slightly larger than card layer 3.5” x 5.5”
8. Apply VersaMark just around the edges of the card stock- direct to paper about 1/2 to 1 inch wide strip. 


9. Continue and apply to all 4 sides of card stock. 


10. Sprinkle Liquid Platinum embossing powder over all areas of VersaMark on edges. 


11. Shake off excess embossing powder gently and use heat gun to activate/melt powder.


12. Load Xyron Creative Station with the 5” Permanent Adhesive cartridge. 


13. Run the stamped card layer through the Xyron Creative Station


14. Adhere the stamped card layer to the card stock mat created in step 11.
15. Run the entire matted card layer through the Xyron Creative Station.


16. Adhere matted card layer to the coordinating card base from the kit. 


17. Choose some 3D Floral Art Stickers and run through the Xyron 3" Sticker Maker (these are already self-adhering so you could skip this step) 


18. Remove sticker, place onto project in corners where desired, add a bit of Zig Clear Wink of Stella for some shine. Add further embellishments from the kit as desired.


19. Repeat steps with other stamp/sentiments to create additional cards or a set.

Tip: Many pieces in the kit are self-adhering, you can always run them through the Xyron as I did to ensure they adhere through the mail etc.

Thanks for joining me today and be sure to tune in to HSN on September 8th for both Anna Griffin and Xyron goodies!


Thursday, August 27, 2015

Butterfly Wings Tag: Paper Wings Productions

Happy Thursday everyone!  I am excited to share with you a tag I created using the Paper Wings Productions Butterfly Wings and the Postcard stamp. I love creating with manila tags because you can really come up with some fantastic colorful backgrounds with just some ink and little bit of water!


I created two manila tags with with this colorful ink background and then used one to stamp the Butterfly Wings and cut them out to "pop" onto the second tag.
To create this fun background I used the Tim Holtz Wrinkle Free Distress Technique and then added a bit of my own flair with some stamping and stenciling.
Here's how:

First I selected the colors of ink I wanted to use- Ranger Distress inks are perfect for this technique because they blend so beautifully with water and the color palette is fantastic!


The inks I chose were: Fossilized Amber, Twisted Citron, Picked Raspberry, Spiced Marmalade and Mermaid Lagoon.


Each color was applied generously direct to my non-stick craft sheet. Do not overlap colors when applying.


Spritz the ink with water from a mister bottle until you can see little droplets of ink (see below).  You can also use a pearlized mist or shimmer mist as well if want a different look with some shine.


Place the manilla tag (or other card stock) onto the inked surface and press gently to pick up ink.


Dry this first layer of ink completely with a heat tool- you can continue to go back and add more color to the tag using the remaining ink- just made sure you dry the tag between layers.

Once you have the desired look you want- ensure the tag is completely dry and stamp the Butterfly Wings in Archival Black and cut out.


I then repeated the above steps to make my background tag. After drying completely I stamped the Postcard Stamp onto the background lightly and in different areas and added some stenciled words using Hero Arts Unicorn White to give the tag some texture and depth.


Here you can see the detail of the Postcard stamp  in the background-I love this look!


To finish off the tag the butterfly wings were "popped" onto the tag with dimensional tape and I used a Tim Holtz ideology pen nib for the body.

I encourage you to play with different colors to create these fun backgrounds for cards and tags- and check out all the stamps at the Paper Wings Productions online store!

Saturday, August 22, 2015

Zebra Quotes: Technique Junkies

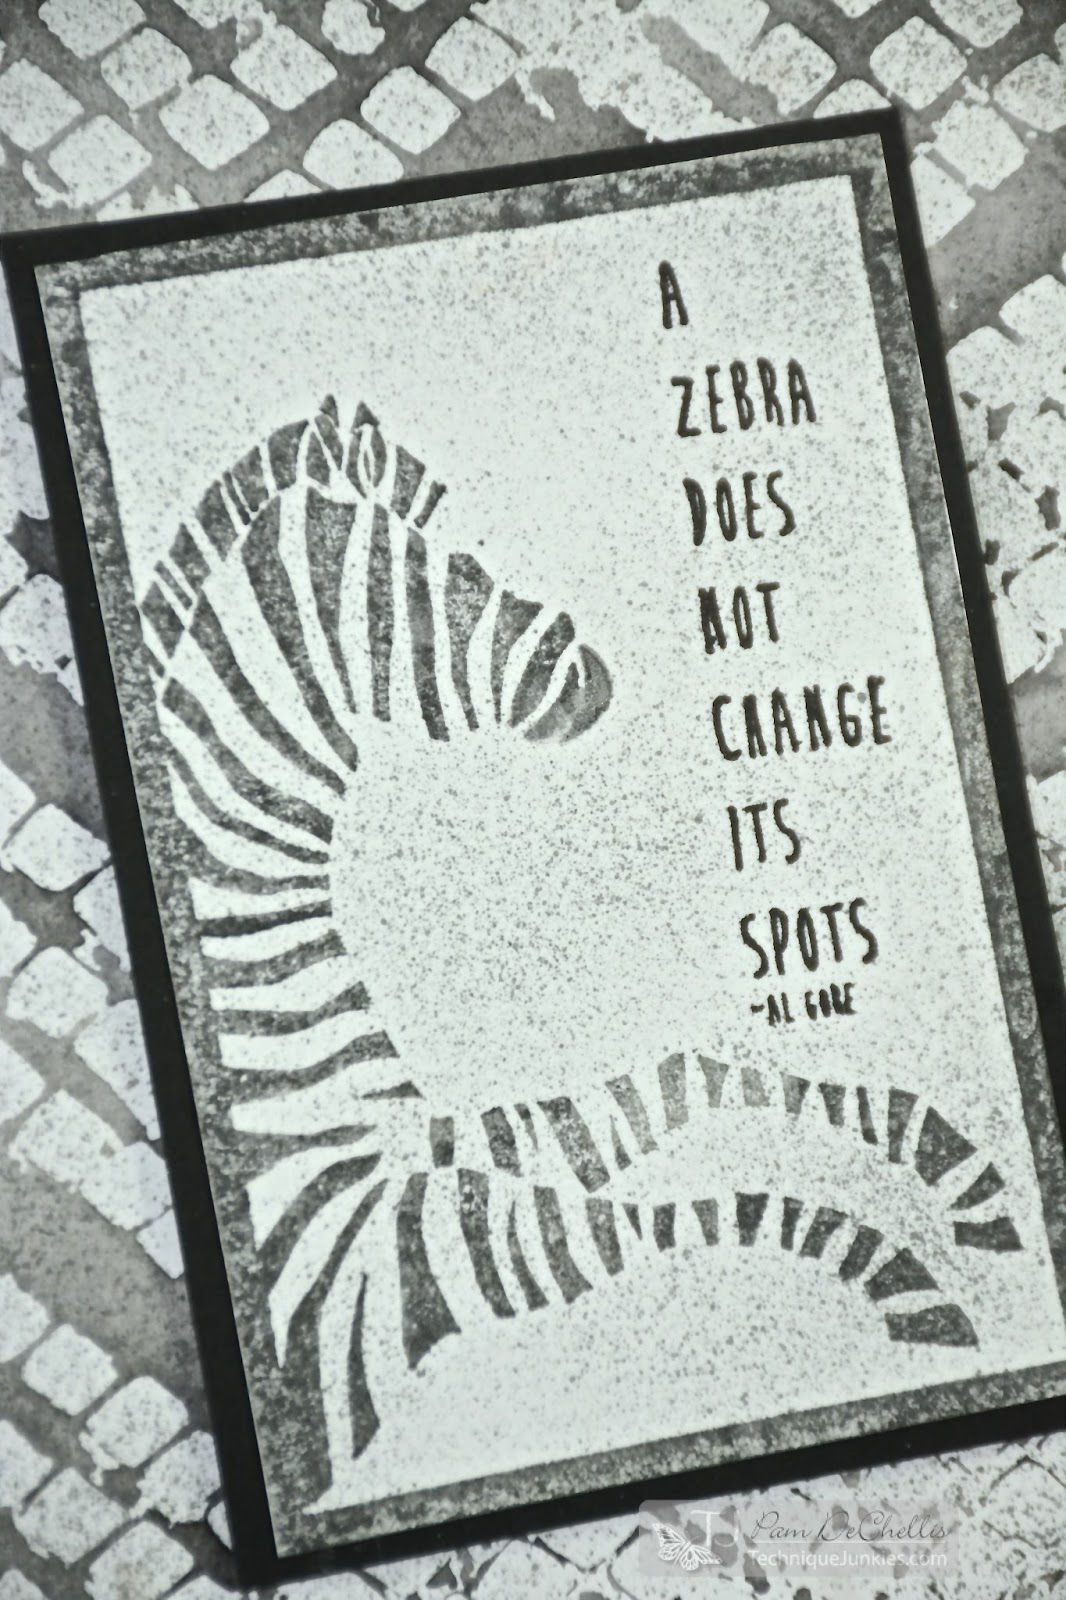
Happy Saturday Junkies! I am here today to share a fun project featuring a pair of Technique Junkies August releases: Zebra ATC  and Zebra Quotes.


I love the monochromatic look of this piece. The background is a stencil mono print using The Crafter's Workshop Chevron stencil and Ranger Distress Ink Black Soot.


The Zebra was also inked  with Black Soot Distress and misted with water before stamping to givie it a softer  tone. The white space was filled in by using the Tim Holtz marker mister with the Black Soot Distress Marker. 
The Zebra quotes set comes with several sentiments- for this card I chose "A Zebra Does Not Change It's Spots" and stamped it with Versafine Black Onyx ink.
Thanks for joining me again this week for another great TJ Inspiration.  Stay tuned on the TJ DT Blog and here on my blog for more fantastic projects featuring the awesome TJ stamps!

Friday, August 21, 2015

Cut it Up Challenge DT Inspiration: Old School

This week on the Cut it Up Challenge blog we are going Old School!  Yup that's right, use an old technique or even something old from your stash and OF COURSE a die cut!
For my DT inspiration I dove into my stash of original Sizzix dies (remember the red ones??) and  chose the pumpkins, because after all - HALLOWEEN is coming and as many of you know it's My FAVORITE holiday to design!


The background of this card is  a stencil mono print with distress ink- using The Crafter's Workshop Stencil - I just love how this pattern reminds me of a jack o"lantern smile!
The pumpkins were die cut from grunge paper, run through my Xyron Creative Station and then covered with Spiced Marmalade and Peeled Paint (stems) Distress Glitter.  The best thing about Distress glitter is it can be inked afterwards so I added a bit of Vintage Photo Distress ink to the edges. The pumpkin faces were colored with Black Soot distress ink and covered with clear embossing powder for a shine.  A bit of yellow Stickles applied to the eyes for a glow.


Trick or Treat was added using Tim Holtz Alpha Parts and just a little bit of Distress Paint.


So break old that OLD SCHOOL stash or even an old technique and join us this week for the Cut it Up Challenge!